Streamer Barrette
(this will make 1 barrette- double supplies and repeat all steps to make a matching pair)
Hot glue gun- pre-heated and ready to go
4 feet 1/4" ribbon (grossgrain, satin, sheer, etc.) color A (royal blue)
4 feet 1/4" ribbon (grossgrain, satin, sheer, etc.) color B (white)
6 tri-beads color A
6 tri-beads color B
1 barrette
Note: for this post I used a Goody Asha Snap Clip; but I have also used the double bar barrette pictured at the end. If your child has thin hair the Goody clip won't fall out, the double bar barrette works best with thicker hair.

Step 1- Place a dot of glue on the underside of the barrette.

Step 2- Fold color A ribbon in half, and place the half-way point on the glue dot. (Work quickly so the glue doesn't dry before you do this)

Step 3- Flip over barrette, and place another drop of glue on front.

Step 4- Weave ribbon end through opening on barrette, going to the opposite side. (e.g. left-right or right-left)
Note: Choose either left first or right and then cross them so you will end up with a chevron design, you will have to maintain this weave pattern for the rest of the barrette or it will not work out smoothly.

Step 5 - Repeat Steps 1 and 2 for Color B.

Step 6- Weave ribbon end through opening on barrette, going to the opposite side. (e.g. left-right or right-left)


Step 7- Alternately finish Step 4 and Step 6 until you reach the end of the barrette. I had to complete Step 4 five (5) times, and Step 6 four (4) times.


Step 8- Place a drop of glue in the middle of front of the barrette.

Step 9- Cross color B ribbon into glue, to hold it in place, but appear to continue the weave pattern.

Step 10- Repeat Step 8 and Step 9 for color A.

Step 11- Place a drop of glue on the underside of barrette.

Step 12- Take the left side and wrap it under the barrette so it comes up and over to the right, and take the right side and wrap it under the barrette so it comes up and over to the left.
Note: In essence you are tying them to keep them in place for the next step.
Step 13- Flip barrette over, and tie a double knot in the middle of the clip. Secure with glue if desired. 

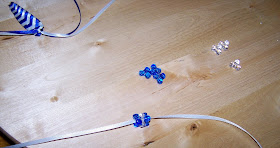
Step 14- Take 1 tri-bead of color B and thread it on to 1 ribbon of color A. Then thread 1 tri-bead of color A. Finish with 1 tri-bead of color B. Shown below. 

Step 17- Repeat Step 16 for remaining color B ribbon. 


What it looks like in Katie's hair. 


Step 14- Take 1 tri-bead of color B and thread it on to 1 ribbon of color A. Then thread 1 tri-bead of color A. Finish with 1 tri-bead of color B. Shown below.
Step 15- Repeat Step 14 for remaining color A ribbon.


Step 16- Take 1 tri-bead of color A and thread it on to 1 ribbon of color B. Then thread 1 tri-bead of color B. Finish with 1 tri-bead of color A. Shown below.

Step 17- Repeat Step 16 for remaining color B ribbon.
Should look like the picture below.

Step 18- Tie a knot at desired length in ribbon. Repeat for all 4 of the ribbons.

Step 18- Tie a knot at desired length in ribbon. Repeat for all 4 of the ribbons.
Note: you might have to make a double knot to keep the tri-bead from falling off.


Step 19- Trim excess ribbon ends off. (I left about 1/4")

What it looks like in Katie's hair.

These are the other clips that I have made Streamer Barrettes from, and are better for thicker hair.


No comments:
Post a Comment